
DIY Everlasting Roses Box
*This post contains affiliate links. See my disclosure about affiliate links here.

I love the look of the beautiful luxurious arrangements from places like Venus Et Fleur, boasting flowers that last up to a year. It’s always special to get flowers, and their long-lasting floral designs are so modern and chic. Some of their designs go so far as to spell out names and depict symbols. I just adore how these boxes of flowers look, so I thought I would try to recreate them myself.
I love this project, because it’s a great gift for so many occasions. You can customize it specifically to your decor or the taste of the receiver. Change up the type of box you use to create different looks (Pro-tip: flowers and a box in the same color create a monochrome look that is extra luxe). You can also play with the types of flowers you use, although the classic rose is my favorite by far for this project. Keep reading for step-by-step instructions!
You Will Need:

Gift Box with Lid
Floral Foam the same size as your box
Faux Roses (with at least 3” stems)
Optional: Craft Glue
Optional: Ribbon
*affiliate links
Instructions:
First, remove the top of your gift box and set it aside.
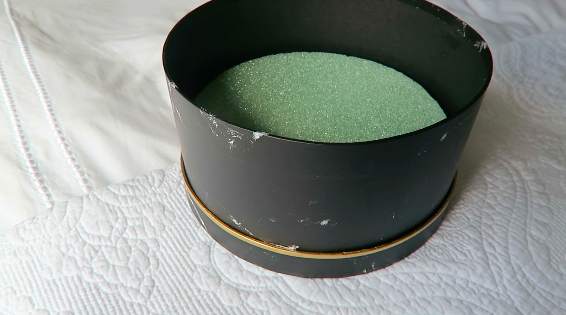
Next, fit your floral foam into your box. You can glue yours in if you’d like, but you want to be sure the foam fills the entire bottom of the box, all the way to the edges. A tight fit is best. I had square foam and a circular box, so I used a knife to cut mine into a circle and squished it down into the box. Floral foam is pretty malleable and it doesn’t have to be perfect. No one will see the foam when you’re finished.

Next, cut all of your flower stems to about 3 inches. You may need to adjust this length depending on the height of your box, but you want the flowers to peek out just above the lip of the box. You don’t have to push the stems all the way through the foam, they just need to go deep enough into the foam that they won’t fall out. If you have short stems, you can use glue to make sure they stay in the foam. If you use the same flowers I did, you will first have to attach the stems to the flowers one by one.

Add your first flower to the inside of the outer edge of the box. Push the stem firmly into the floral foam, making sure that the outer edge of the flower lines up with the edge of the box. The flower should just peek over the top of the box’s opening. Add your next flower the same way, keeping the height and distance from the edge of the box consistent. Make sure your second flower is close enough to the first flower that you don’t see any space between them. Continue adding flowers like this, making sure you don’t have any gaps, until you have a complete ring of flowers along the outer edge of the box.

To make the next ring of flowers, pick a spot where two of the outer ring flowers meet, and add a flower just inside of those two. Make sure there is no space between any of the flowers and keep the height consistent. Continue adding flowers in rings, working towards the center. Make sure not to leave any gaps between them and keep every flower at the same height.

When you’ve filled in the center of the box, set the box into the lid. I also decided that my arrangement needed an extra touch, so I added a ribbon bow around the outside of the box and secured it with double-stick tape.

I bought a trio of boxes and a big pack of flowers, and for all three boxes, barely used half of the flowers. You need a lot, but really not as many as you think! I will definitely be doing this project again and try some different color combinations. It’s such an easy and budget-friendly way to get the same look.
Leave a comment and let me know if you liked this DIY project and want to see more like it. If you try this project, please tag me on social media or send me an email! I would love to see how yours turns out and what colors you chose!
And if you prefer to watch, here’s my video tutorial on Youtube:


Thank you for supporting my blog by shopping through my affiliate links. An affiliate link means I may earn advertising or referral fees if you purchase through my link, without any extra cost to you. For more information, see my full disclosure here.